A free, open-source Health Information Management System built with Laravel 10 and MySQL. Designed for multi-clinic hospital networks, it supports patient registration, clinical workflows (Doctor → Nurse → Pharmacist), drug prescriptions, pharmacy stock management, medical terminology autocomplete, and a fully dynamic clinical page builder.
- Features
- Requirements
- Installation
- First-Time Setup (Admin)
- Daily Clinical Use
- Advanced: Custom Unit Templates
- Advanced: Custom View Templates & Clinical Pages
- Advanced: Custom Terminology Boxes
- Advanced: Using Terminology in Blade Views
- Database Schema
- License
- Multi-clinic, multi-institution hierarchy
- Role-based access: Admin and Clinical staff
- Patient registration with duplicate detection (NIC / mobile)
- Queue management per clinic per day
- Doctor visit notes: complaints, history, examination, investigations, drugs, allergies, BP readings
- Pharmacist stock management with low-stock alerts and expiry tracking
- Prescription dispensing with audit trail
- Dynamic Unit Templates — add custom clinic types from the admin UI (no code changes)
- Dynamic View Templates — add custom clinical views from the admin UI; blade file auto-scaffolded with full developer guide
- Dynamic Terminology Boxes — add custom terminology categories from the admin UI; slug immediately usable in clinical pages
- Medical terminology autocomplete (19 built-in + unlimited custom categories)
- Drug name master list with dose/frequency defaults
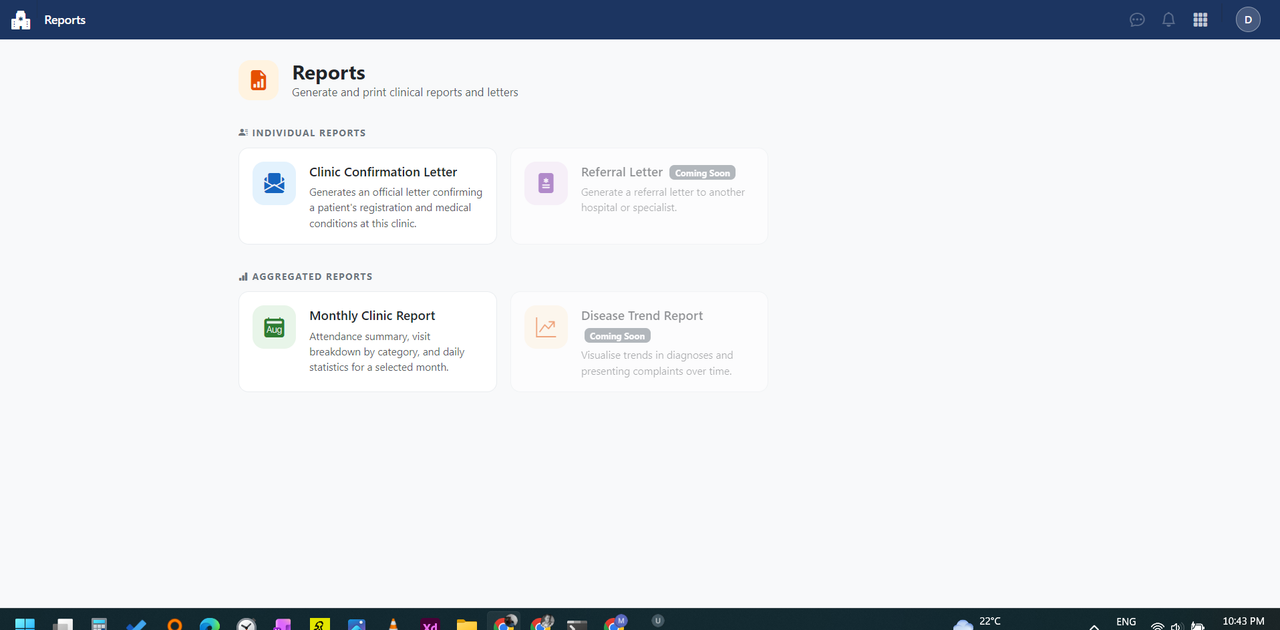
- Clinic confirmation letters and monthly reports
- Fully local frontend (Bootstrap 5 + Bootstrap Icons, no CDN dependency)
| Component | Version |
|---|---|
| PHP | 8.1+ |
| Laravel | 10.x |
| MySQL / MariaDB | 10.4+ |
| Node.js | 16+ (for npm install only) |
| Composer | 2.x |
Recommended: XAMPP (Apache + MySQL + PHP bundled).
# 1. Clone the repository
git clone https://github.com/your-org/openhims2.git
cd openhims2

# 2. Install PHP dependencies
composer install

# 3. Install frontend dependencies (Bootstrap + Icons)
npm install bootstrap bootstrap-icons

# 4. Copy Bootstrap to public/vendor/ (no Vite build needed)
php artisan app:publish-assets

# 5. Create your environment file
cp .env.example .env
php artisan key:generate

# 6. Configure your database in .env
#    DB_DATABASE=phims
#    DB_USERNAME=root
#    DB_PASSWORD=

# 7. Run migrations and seed default data
php artisan migrate:fresh --seed

# 8. Start the development server
php artisan serve
# → http://127.0.0.1:8000# Place project in H:\xampp\htdocs\openhims2
# Access via: http://localhost/openhims2/public
# In .env set:
# DB_HOST=127.0.0.1
# DB_DATABASE=phims
# DB_USERNAME=root
# DB_PASSWORD=
composer install
npm install bootstrap bootstrap-icons
php artisan app:publish-assets
php artisan migrate:fresh --seedThe database.sql file in this repository contains the full schema, system seed data, and demo data.
# 1. Create database
mysql -u root -p -e "CREATE DATABASE phims CHARACTER SET utf8mb4 COLLATE utf8mb4_unicode_ci;"

# 2. Import schema + seed data
mysql -u root -p phims < database.sql

# 3. Create the admin user
php artisan db:seed --class=AdminSeederAfter installation, log in at / with:
Email:    admin@phims.lk
Password: password
Change this password immediately via Admin → Profile.
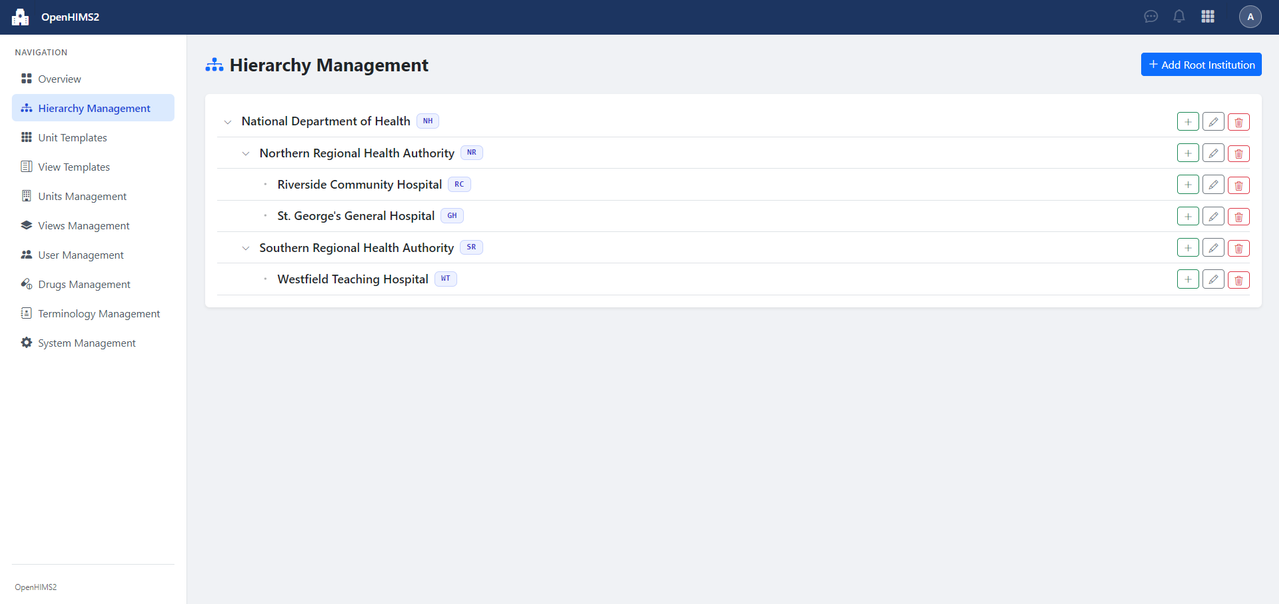
Admin → Institution Hierarchy
Institutions represent your physical locations. They support a parent-child hierarchy:
National Department of Health       ← top-level institution
  └─ Northern Regional Authority    ← child
       └─ St. George's Hospital     ← leaf (where units live)
Fields:
-
Name — full institution name
-
Code — short identifier (e.g.,
GMC-AKR) -
Parent Institution — leave blank for top-level
-
Email, phone, address (optional)
Admin → Unit Management
A Unit is a physical clinic room/ward within an institution. Each unit is typed by a Unit Template (e.g., GMC, DC, GP).
Fields:
- Unit Name — e.g.,
City General Clinic - Unit Number — optional identifier
- Institution — which institution this unit belongs to
- Unit Template — the clinic type
| Unit Template | Code | Typical use |
|---|---|---|
| General Medical Clinic | GMC | OPD / clinic consultations |
| Dental Clinic | DC | Dental consultations |
| General Inward | GI | Ward/inpatient |
| General Pharmacy | GP | Pharmacy dispensing |
| Office | OFFICE | Admin / staff |
Custom unit templates (created via Admin → Unit Templates) also appear here.

Admin → View Management
A Unit View is an instance of a role-view at a specific unit.
Steps:
- Select the Unit
- Select the View Template (role-based view for that unit type)
- Give it a name (e.g.,
City General Clinic — Doctor) - Save
Available built-in View Templates per Unit Template:
| Unit Template | Available View Templates |
|---|---|
| GMC | Doctor View, Clerk View, Nurse View |
| DC | Doctor View, Clerk View, Nurse View |
| GI | Doctor View, Clerk View, Nurse View |
| GP | Doctor View, Pharmacist View, Clerk View |
| OFFICE | Doctor View, Nurse View, Clerk View |
Custom view templates (created via Admin → View Templates) also appear here.
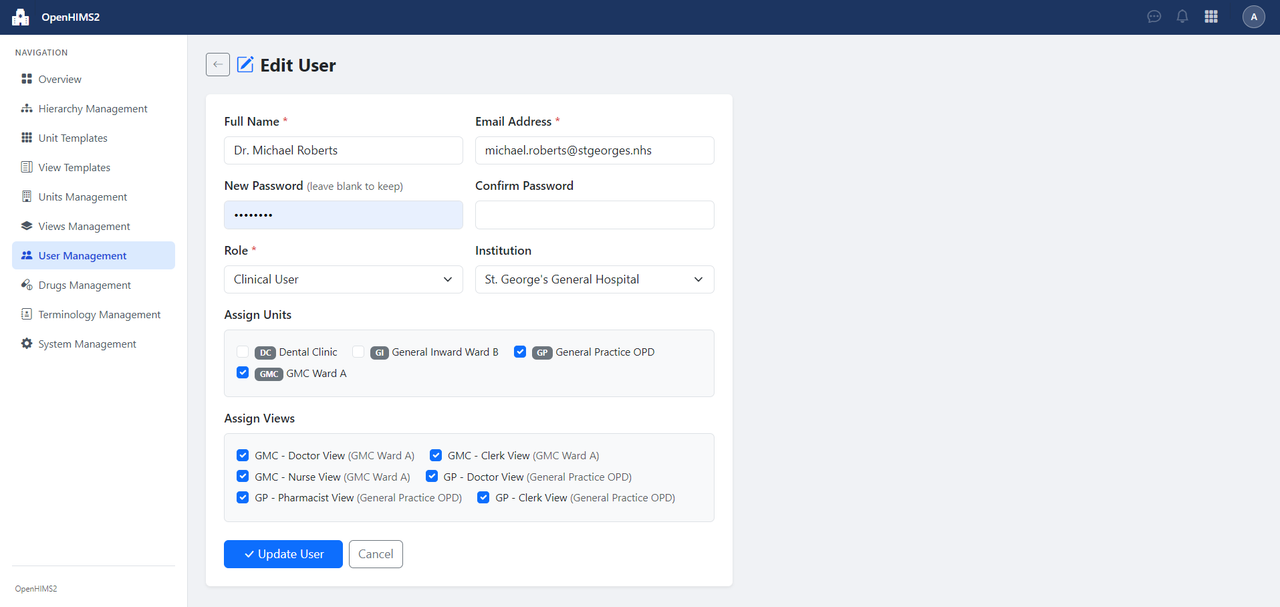
Admin → User Management
Fields:
- Name, Email, Password — login credentials
- Role —
admin(full admin access) oruser(clinical access) - Institution — the user's home institution
- Units — which physical units this user can access
- Views — which Unit Views this user can see (determines the clinical pages shown at login)
Important: A clinical user must have at least one View assigned to log in.
Login behavior:
- 1 view → lands directly on that view's clinical page
- Multiple views → presented with a selection screen
- Admin role → always goes to
/admin/dashboard
The form is AJAX-driven: selecting an Institution auto-loads its Units; selecting Units auto-loads available Views.
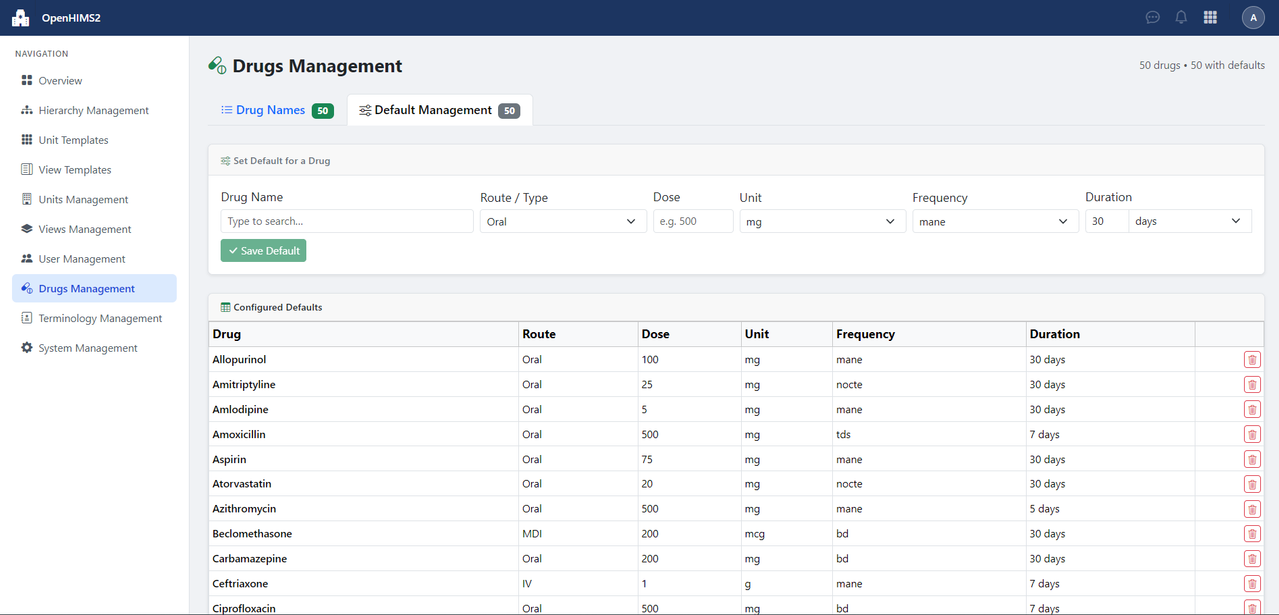
Admin → Drug Management
Click Add Drug and type the drug name (e.g., Metformin 500mg).
Click Set Default to pre-fill prescribing defaults:
| Field | Options |
|---|---|
| Type | Oral, S/C, IM, IV, S/L, Syrup, MDI, DPI, Suppository, LA |
| Dose | Numeric value |
| Unit | mg, g, mcg, ml, tabs, item |
| Frequency | mane, nocte, bd, tds, daily, EOD, SOS |
| Duration | Number of days |
When a doctor searches for this drug, these defaults auto-fill the prescription form.
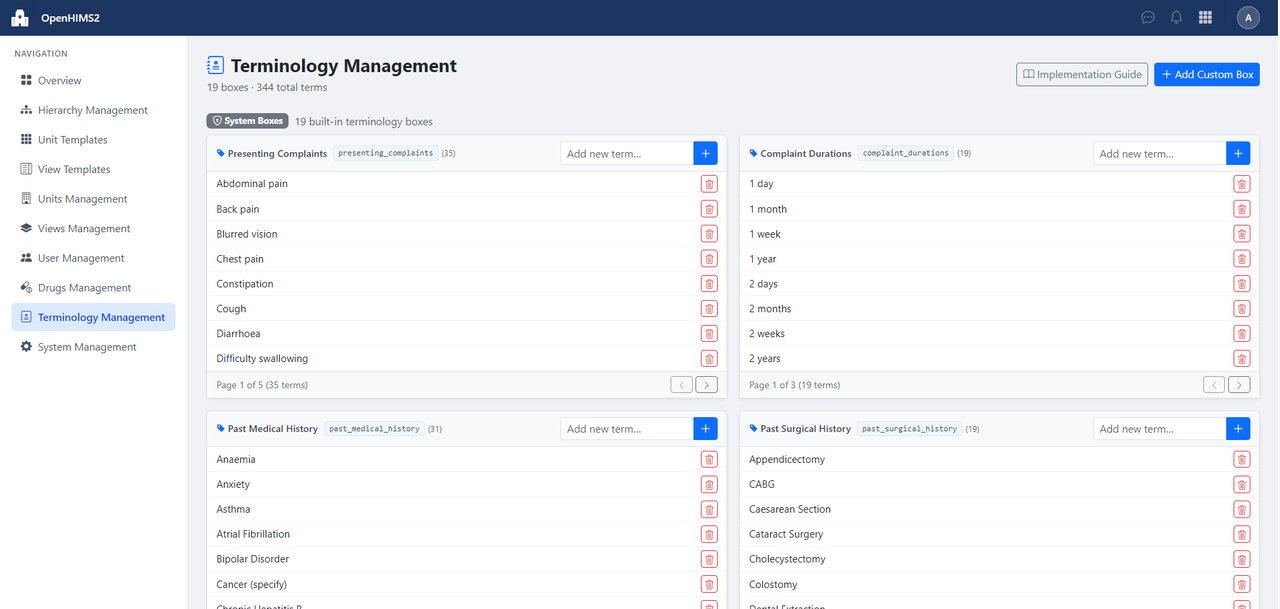
Admin → Terminology
Terminology terms provide autocomplete suggestions in clinical forms. Terms are grouped into boxes (categories).
| Slug | Display Name |
|---|---|
presenting_complaints |
Presenting Complaints |
complaint_durations |
Complaint Durations |
past_medical_history |
Past Medical History |
past_surgical_history |
Past Surgical History |
social_history |
Social History |
menstrual_history |
Menstrual History |
investigations |
Investigations |
general_looking |
General Looking |
cardiology_findings |
Cardiology Examination Findings |
respiratory_findings |
Respiratory Examination Findings |
abdominal_findings |
Abdominal Examination Findings |
neurological_findings |
Neurological Examination |
dermatological_findings |
Dermatological Findings |
differential_diagnosis |
Differential Diagnosis |
working_diagnosis |
Working Diagnosis |
diabetes_instructions |
Diabetes Instructions |
hypertension_instructions |
Hypertension Instructions |
dyslipidemia_instructions |
Dyslipidemia Instructions |
general_instructions |
General Instructions |
Type in the "Add new term…" box within any category card and click Save. Terms appear instantly via AJAX.
Click Add Custom Box (top-right) → enter a name (slug is auto-generated) → Create Box. Your new box appears immediately with its slug displayed. See Advanced: Custom Terminology Boxes for how to wire it into a clinical page.
Click Implementation Guide (top-right) for ready-to-copy code snippets showing how to embed any terminology box in a clinical blade file.
-
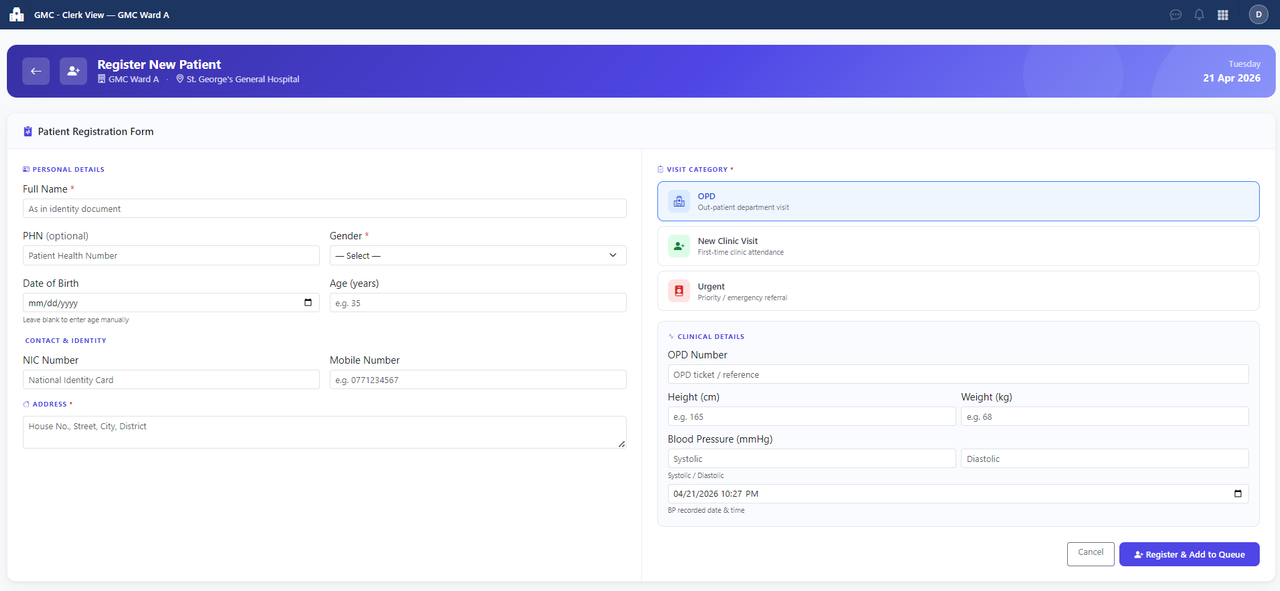
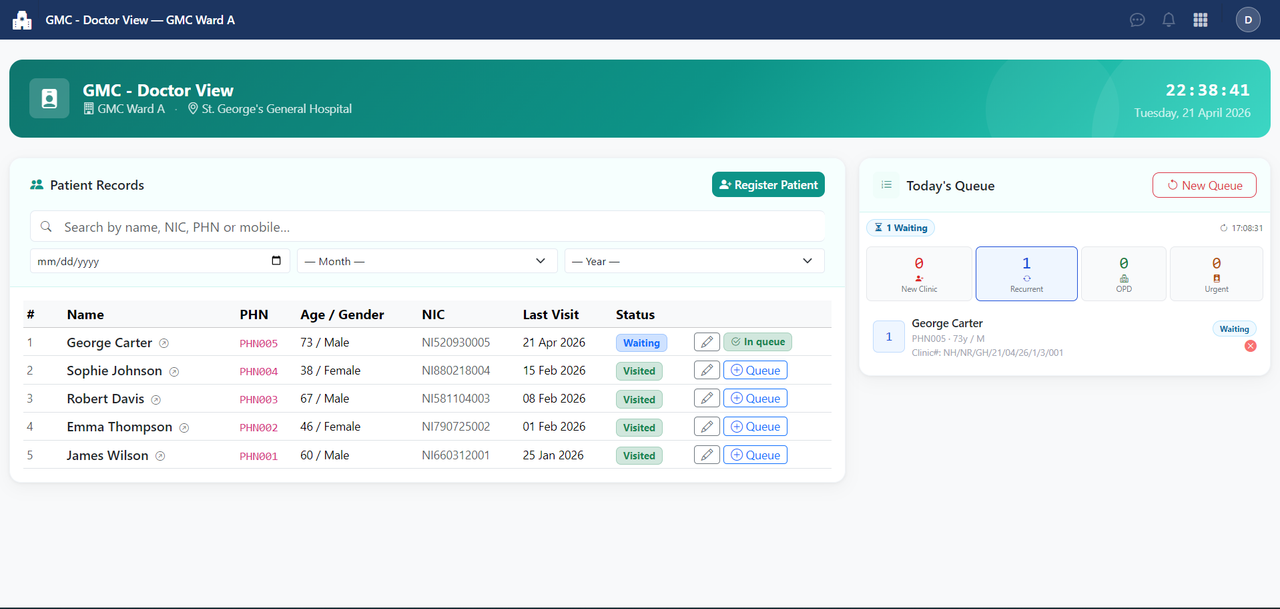
Register a new patient: Click
Register Patient→ fill in Name, DOB/Age, Gender, NIC, Mobile, Address → Save. -
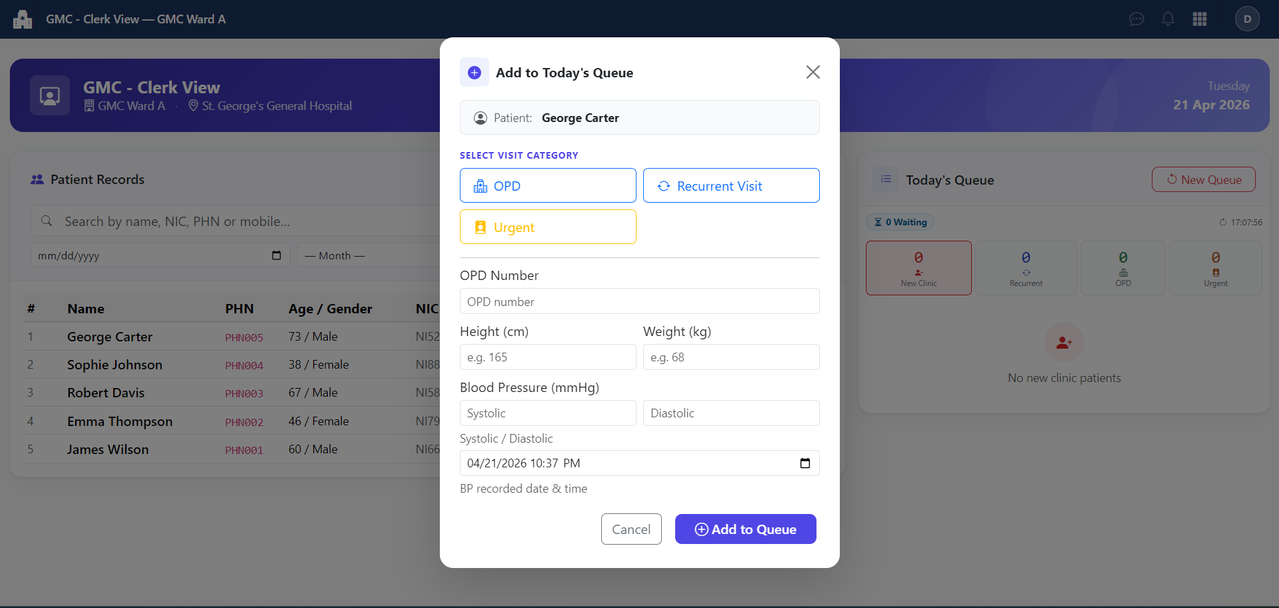
Add patient to queue: Click
Add to Queue→ select visit category:- OPD — general outpatient (OPD number, height, weight, BP)
- New Clinic Visit — first attendance (clinic number assigned)
- Recurrent Clinic Visit — follow-up
- Urgent — priority case
-
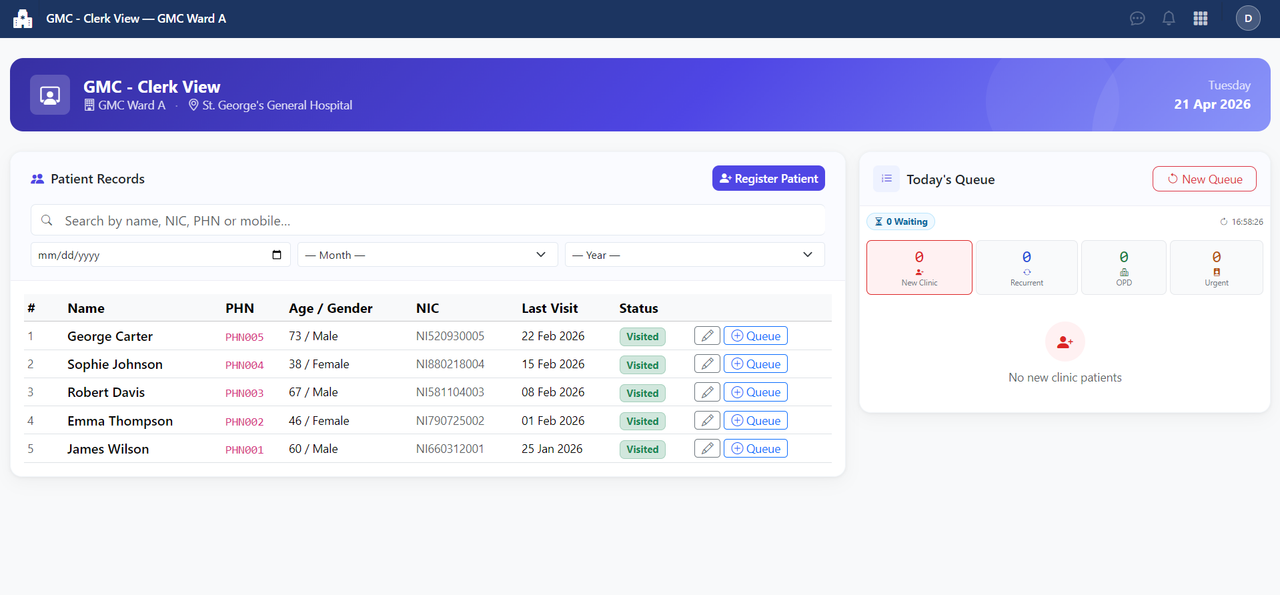
Monitor queue: All patients waiting, in-progress, and visited today.
-
Reset queue: At end of day to start fresh the next morning.
-
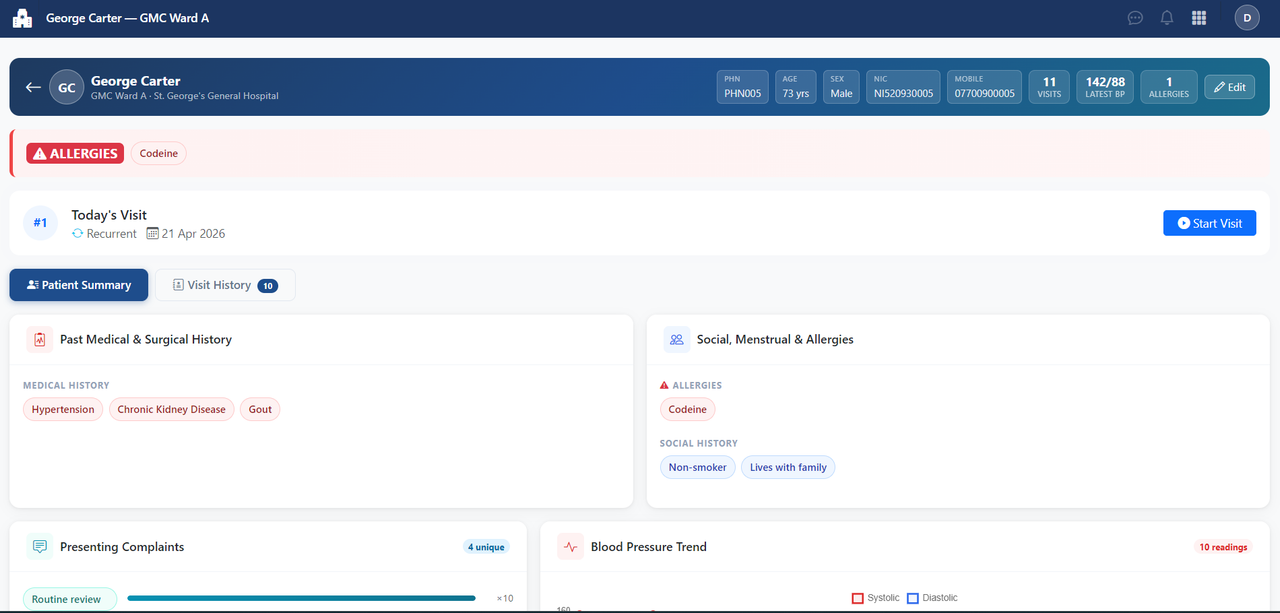
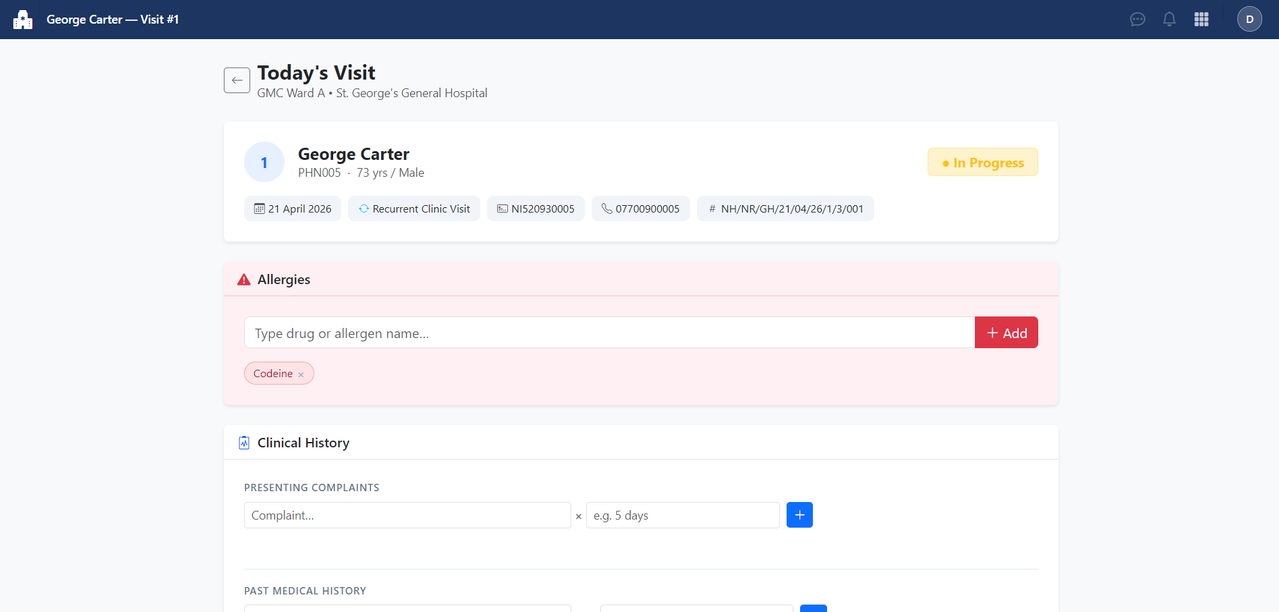
Select a patient from queue → opens the visit form.
-
Presenting Complaints — with durations, using terminology autocomplete.
-
History — past medical, surgical, social, menstrual — all with autocomplete.
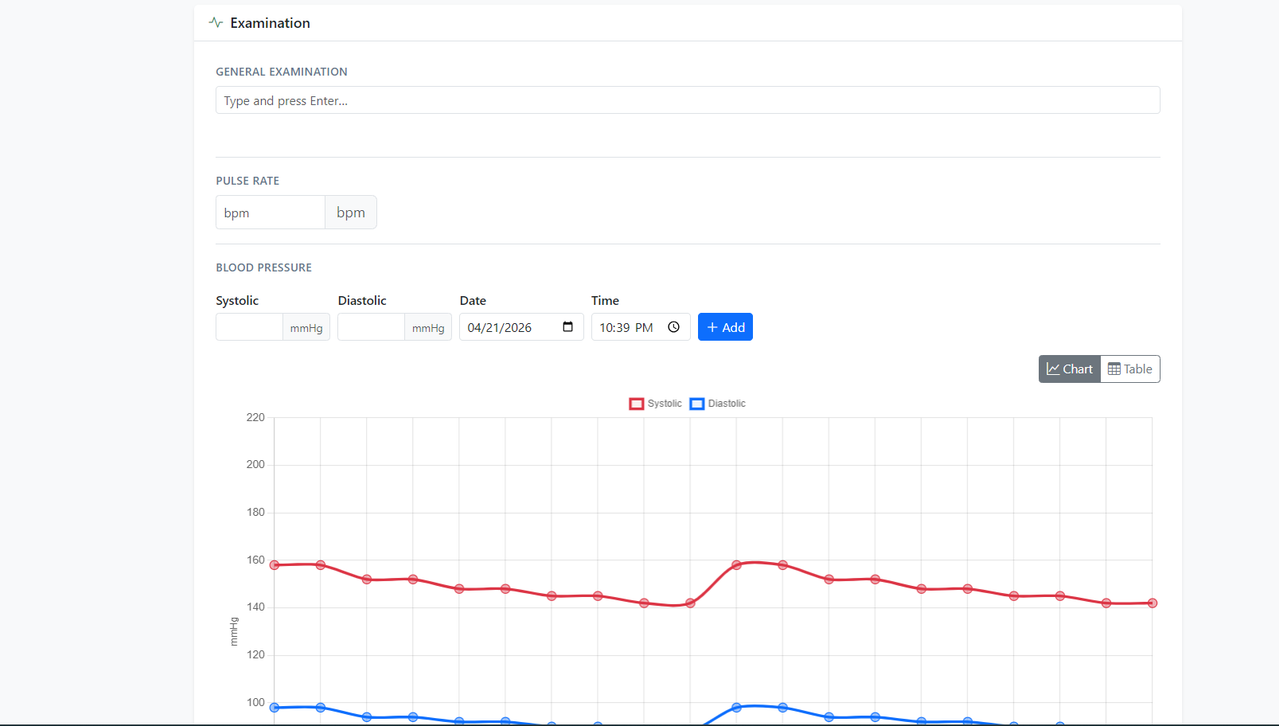
-
Examination — general, cardiovascular, respiratory, abdominal, neurological, dermatological.
-
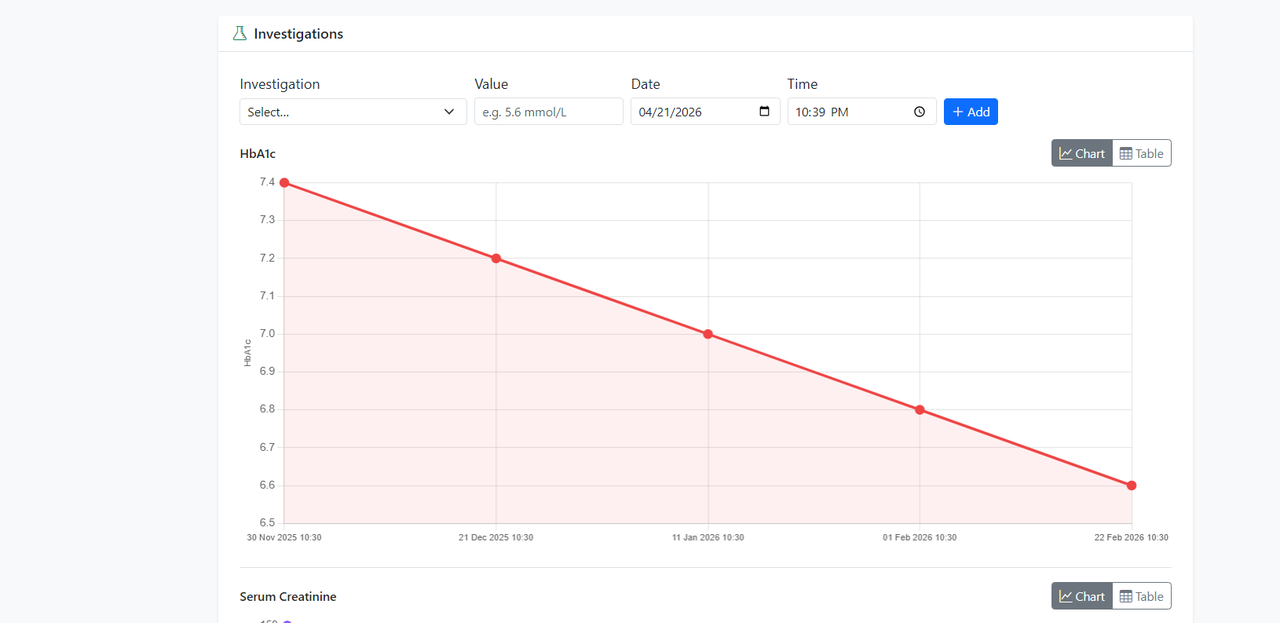
Investigations — name + result (e.g.,
FBS: 6.2 mmol/L). -
Blood Pressure — one or more readings.
-
Allergies — persists across all visits.
-
Diagnoses — differential and working diagnosis.
-
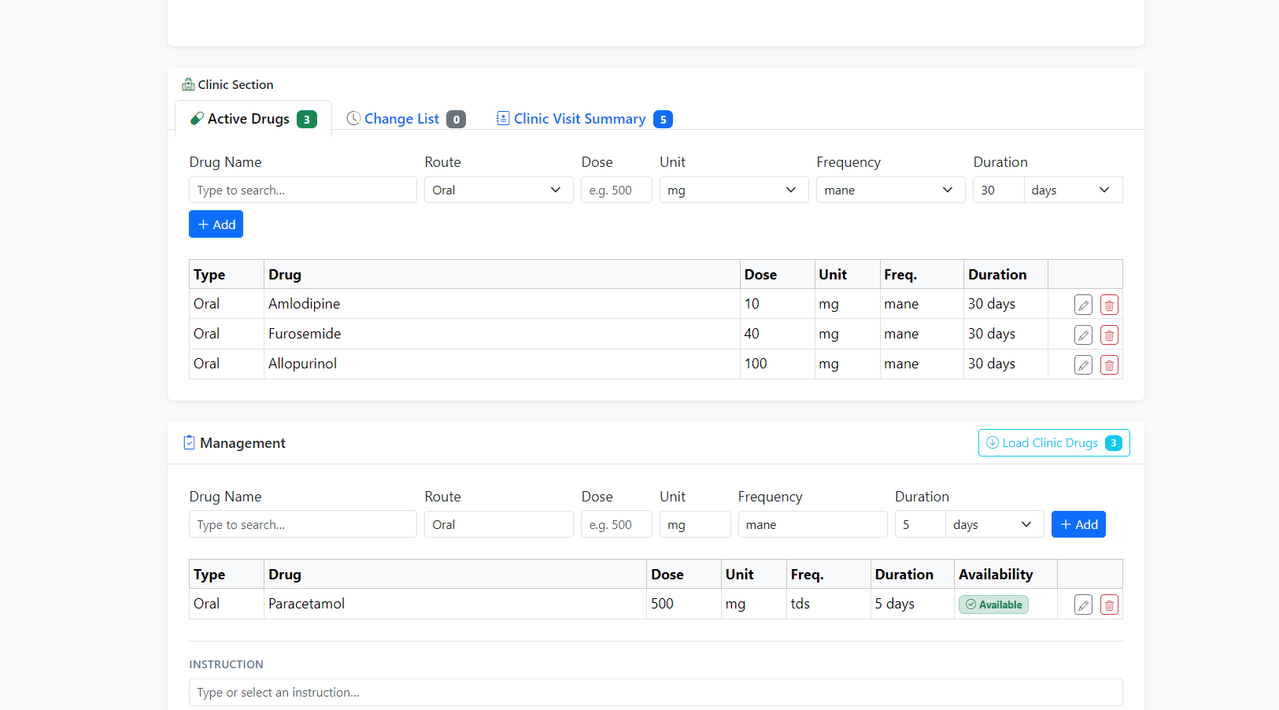
Drugs — search → defaults auto-fill → adjust if needed. Full audit log of changes.
-
Management Instructions — free-text plus instruction bundles.
-
End Visit — marks patient visited; moves to pharmacist queue.
Read-access summary view. Nurses can:
- View the patient list for the day
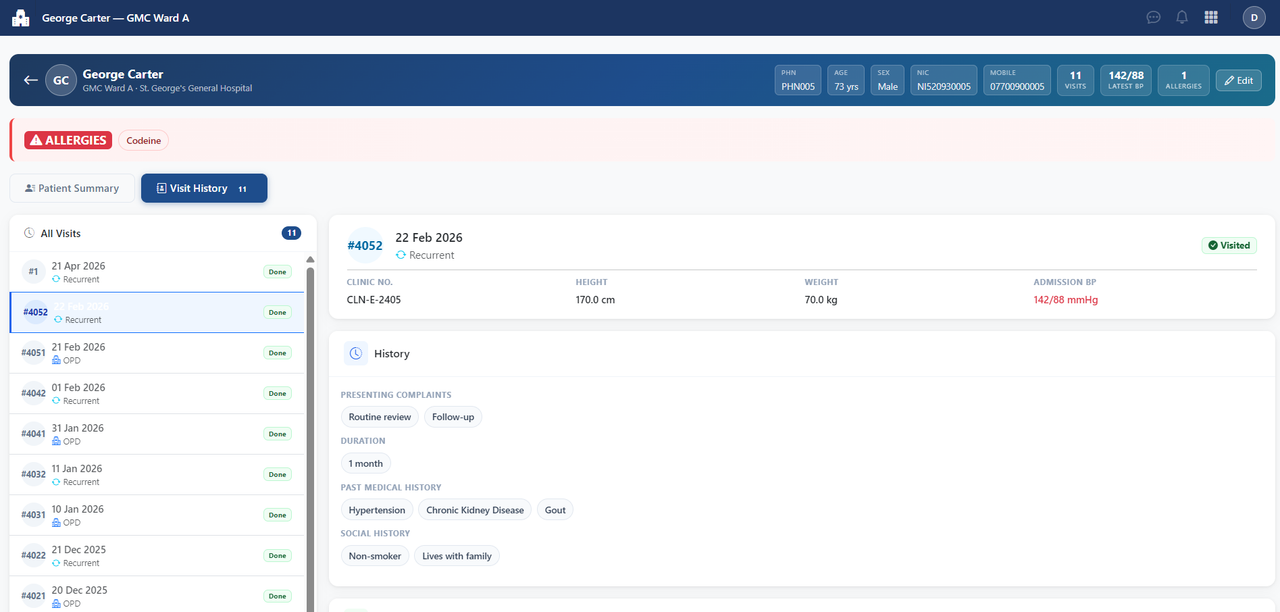
- Open patient history (all past visits)
- View visit summaries (notes, drugs, BP, investigations)
The nurse view does not modify clinical data.
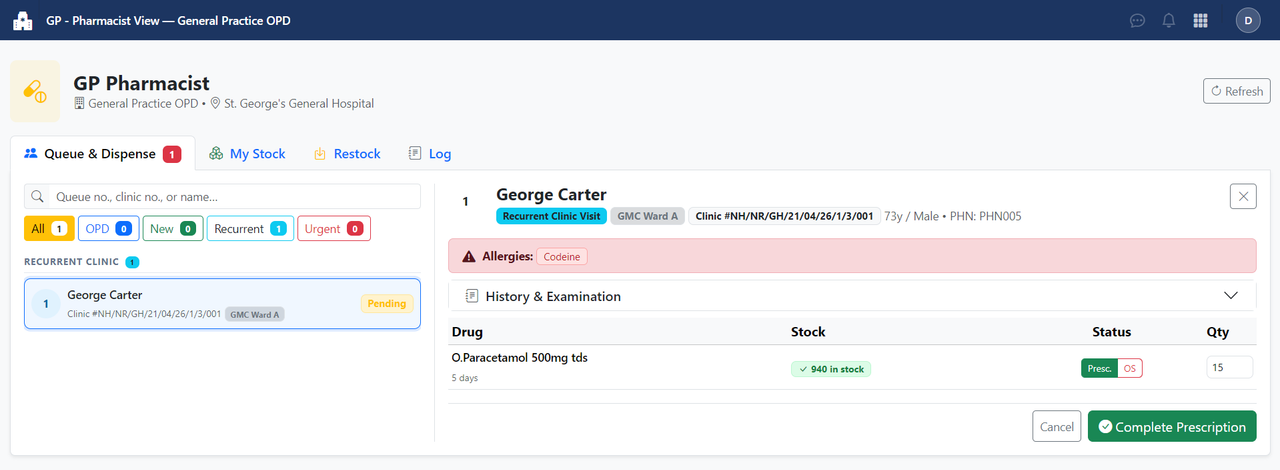
- Queue shows patients with
visitedstatus - Click patient → view full prescription
- For each drug: click
Dispense→ select stock item → enter quantity - Mark visit as
Dispensedwhen complete
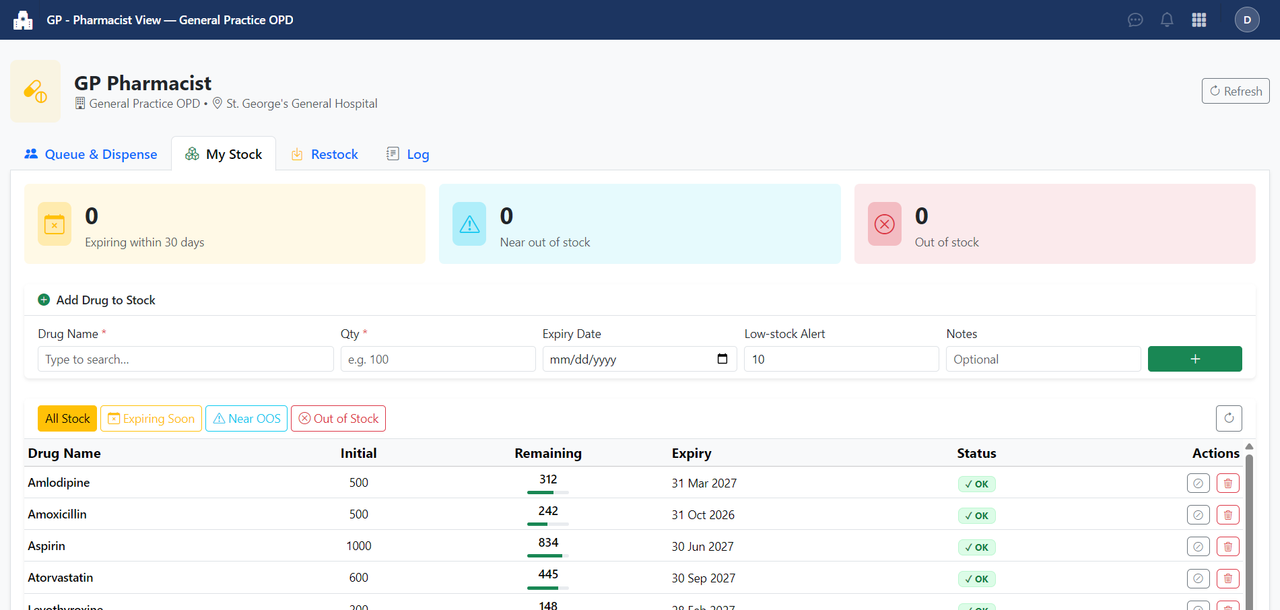
-
Add Stock: drug name, initial quantity, expiry date, low-stock threshold
-
Restock: add quantity to existing stock (logged)
-
Mark Out of Stock: toggle manually
-
Alerts panel: drugs expiring ≤30 days, below threshold, or out of stock
Unit Templates define clinic types. The 5 built-in templates (GMC, DC, GI, GP, OFFICE) are system-protected and cannot be deleted. You can add your own.
- Go to Admin → Unit Templates
- Click Add Unit Template
- Enter a name (e.g.,
Rehabilitation Hub) and a code (e.g.,RH) — the code is auto-uppercased - Save
The new template appears immediately in Unit Management when creating units.
Add to database/seeders/UnitTemplateSeeder.php:
UnitTemplate::firstOrCreate(['code' => 'RH'], [
    'name'      => 'Rehabilitation Hub',
    'code'      => 'RH',
    'is_system' => true,   // set true if you want it protected from UI deletion
]);
php artisan db:seed --class=UnitTemplateSeederView Templates define role-based views for a Unit Template. Each template has a blade_path that points to a Blade file.
- Go to Admin → View Templates
- Click Add View Template (or the
+ Add Viewbutton on a specific unit template row) - Fill in:
- Unit Template — which clinic type this view belongs to
- View Template Name — e.g.,
RH - Physio View - Code — auto-generated slug (e.g.,
rh-physio) - Blade Path — dot-notation path (e.g.,
clinical.rh.physio) — auto-suggested from the name
- Save
What happens automatically:
- The view template record is created in the database
- The blade file is created at
resources/views/clinical/rh/physio.blade.php - The blade file contains a full Developer Starter Guide (tabbed UI with 6 sections — see below)
After creating the view template:
- Go to Admin → View Management and create a Unit View linking a unit to the new template
- Assign the Unit View to a user
- The user can now log in and reach the new clinical page
$rhTemplate = UnitTemplate::where('code', 'RH')->first();

ViewTemplate::firstOrCreate(['code' => 'rh-physio'], [
    'name'             => 'RH - Physio View',
    'code'             => 'rh-physio',
    'blade_path'       => 'clinical.rh.physio',
    'unit_template_id' => $rhTemplate->id,
    'is_system'        => false,
]);When a clinical user visits a newly-created view, they see a Developer Starter Guide — a full-page tabbed interface embedded in the blade file itself. The guide includes:
| Tab | Contents |
|---|---|
| Getting Started | 4-step instructions, live context values, working live examples |
| Starter Template | Copy-paste ready blank clinical page with syntax highlighting |
| Components | Snippets for alerts, cards, tables, forms, modals — with live preview |
| Search Boxes | Live terminology and drug autocomplete demos with copyable code |
| Variables | All PHP variables available in the view, with live rendered values |
| Backend | How to add routes and a controller for this page |
All code blocks have copy-to-clipboard buttons.
To replace the guide with a real page, open the blade file in your editor and replace its content. The file path is shown prominently in the guide banner.
ClinicalDashboardController::show() injects these into every view:
$unitView       // UnitView model — the specific view instance the user selected
$unit           // Unit model — has ->name, ->institution, ->unitTemplate
$viewTemplate   // ViewTemplate model — has ->name, ->code, ->blade_path
$pageTitle      // String: "View Name — Unit Name"
auth()->user() // The currently authenticated User model@extends('layouts.clinical')
@section('title', $pageTitle)
@push('styles')
<style>
/* page-specific CSS */
</style>
@endpush
@section('content')
<div class="mb-4 d-flex align-items-start justify-content-between">
<div>
<h4 class="fw-bold mb-1">{{ $pageTitle }}</h4>
<p class="text-muted small mb-0">
{{ $unit->name }} · {{ $unit->institution->name ?? '' }}
</p>
</div>
</div>
<div class="card border-0 shadow-sm">
<div class="card-body p-4">
<!-- your clinical content -->
</div>
</div>
@endsection
@push('scripts')
<script>
// page-specific JS
const CSRF = document.querySelector('meta[name="csrf-token"]').content;
</script>
@endpushPlace new routes before the /{unitView} catch-all at the bottom of the clinical group in routes/web.php:
use App\Http\Controllers\Clinical\MyPageController;

Route::get('/{unitView}/my-page',  [MyPageController::class, 'index'])->name('clinical.my-page');
Route::post('/{unitView}/my-page', [MyPageController::class, 'store'])->name('clinical.my-page.store');
php artisan make:controller Clinical/MyPageControllerController boilerplate:
namespace App\Http\Controllers\Clinical;

use App\Http\Controllers\Controller;
use App\Models\UnitView;
use Illuminate\Http\Request;

class MyPageController extends Controller
{
    public function index(UnitView $unitView)
    {
        $unit         = $unitView->unit->load('institution', 'unitTemplate');
        $viewTemplate = $unitView->viewTemplate;
        $pageTitle    = $viewTemplate->name . ' — ' . $unit->name;
        $items        = MyModel::where('unit_id', $unit->id)->latest()->get();

        return view('clinical.my.page', compact('unitView', 'unit', 'viewTemplate', 'pageTitle', 'items'));
    }

    public function store(Request $request, UnitView $unitView)
    {
        $data = $request->validate(['notes' => 'required|string']);
        MyModel::create($data + ['unit_id' => $unitView->unit_id]);
        return back()->with('success', 'Saved.');
    }
}Terminology boxes are named categories of terms. You can add unlimited custom boxes alongside the 19 built-in system boxes.
- Go to Admin → Terminology
- Click Add Custom Box (top-right)
- Enter:
- Box Name — displayed as the section heading (e.g.,
Orthopaedic Findings) - Slug — auto-generated from the name (e.g.,
orthopaedic_findings); this is the value you use asdata-categoryin HTML - Description — optional note about what the box is for
- Box Name — displayed as the section heading (e.g.,
- Save
The new box appears at the bottom of the terminology management page. Add terms to it immediately.
A custom box can only be deleted when it has no terms. Delete all terms first, then use the trash icon in the box header.
System boxes (the original 19) are protected and cannot be deleted.
Once you have a custom box with slug orthopaedic_findings, add this HTML to any clinical blade file:
<input type="text"
       class="form-control terminology-search"
       data-category="orthopaedic_findings"
       name="ortho_findings"
       placeholder="Type a finding...">
The autocomplete is wired up automatically — no JavaScript needed.
The Implementation Guide button at the top-right of the Terminology Management page shows all slugs with copy buttons and ready-to-paste code examples.
use App\Models\TerminologyCategory;
use App\Models\TerminologyTerm;

TerminologyCategory::firstOrCreate(['slug' => 'orthopaedic_findings'], [
    'name'        => 'Orthopaedic Findings',
    'slug'        => 'orthopaedic_findings',
    'description' => 'Musculoskeletal examination findings',
    'is_system'   => false,
    'sort_order'  => 100,
]);

$terms = ['Normal range of motion', 'Limited flexion', 'Joint effusion', 'Crepitus'];
foreach ($terms as $term) {
    TerminologyTerm::firstOrCreate([
        'category' => 'orthopaedic_findings',
        'term'     => $term,
    ]);
}<!-- Search across all terms in a category -->
<input type="text"
class="form-control terminology-search"
data-category="presenting_complaints"
name="complaint"
placeholder="Start typing...">The terminology-search class is wired globally by the clinical layout. Multiple inputs on the same page all work independently.
fetch(`/terminology/search?category=presenting_complaints&q=${encodeURIComponent(query)}`)
    .then(r => r.json())
    .then(terms => {
        // terms = ["Headache", "Chest pain", "Fever", ...]
});GET /terminology/search?category={slug}&q={query}
Auth: Any authenticated user (admin or clinical)
Params: category — required, must be a valid slug
q — optional search string (partial match)
Response: JSON array of strings e.g. ["Headache", "Chest pain"]
This is the pattern used in the GMC Doctor view for multi-select terminology fields:
<div class="position-relative">
    <input type="text"
           class="form-control terminology-ac"
           data-category="presenting_complaints"
           placeholder="Type to search..."
           autocomplete="off">
    <ul class="list-group position-absolute w-100 shadow-sm"
        id="complaints-suggestions"
        style="display:none; max-height:200px; overflow-y:auto; z-index:10;"></ul>
</div>
<div id="complaints-tags" class="d-flex flex-wrap gap-1 mt-2"></div>
<input type="hidden" name="presenting_complaints" id="complaints-hidden" value="[]">document.querySelectorAll('.terminology-ac').forEach(input => {
const category = input.dataset.category;
const suggestBox = document.getElementById(category + '-suggestions');
const tagsBox = document.getElementById(category + '-tags');
const hiddenField = document.getElementById(category + '-hidden');
let selected = JSON.parse(hiddenField.value || '[]');
function renderTags() {
tagsBox.innerHTML = selected.map((t, i) =>
`<span class="badge bg-primary d-flex align-items-center gap-1">
${t}
<button type="button" class="btn-close btn-close-white btn-sm"
data-index="${i}" style="font-size:.6rem;"></button>
</span>`
).join('');
hiddenField.value = JSON.stringify(selected);
tagsBox.querySelectorAll('.btn-close').forEach(btn => {
btn.addEventListener('click', () => {
selected.splice(parseInt(btn.dataset.index), 1);
renderTags();
});
});
}
let timer;
input.addEventListener('input', function () {
clearTimeout(timer);
const q = this.value.trim();
if (!q) { suggestBox.style.display = 'none'; return; }
timer = setTimeout(() => {
fetch(`/terminology/search?category=${category}&q=${encodeURIComponent(q)}`)
.then(r => r.json())
.then(terms => {
suggestBox.innerHTML = terms
.filter(t => !selected.includes(t))
.map(t => `<li class="list-group-item list-group-item-action py-1 px-2"
style="cursor:pointer">${t}</li>`)
.join('') || '<li class="list-group-item py-1 px-2 text-muted">No results</li>';
suggestBox.style.display = 'block';
suggestBox.querySelectorAll('li:not(.text-muted)').forEach(li => {
li.addEventListener('click', () => {
selected.push(li.textContent.trim());
renderTags();
input.value = '';
suggestBox.style.display = 'none';
});
});
});
}, 200);
});
document.addEventListener('click', e => {
if (!input.contains(e.target) && !suggestBox.contains(e.target))
suggestBox.style.display = 'none';
});
renderTags();
});The hidden input submits a JSON string. Cast the field to array in the model:
// app/Models/VisitNote.php
protected $casts = [
    'presenting_complaints' => 'array',
    // add your custom field here:
    'orthopaedic_findings'  => 'array',
];
// In your controller store() / update():
$visit->note()->updateOrCreate(
['visit_id' => $visit->id],
['orthopaedic_findings' => $request->input('orthopaedic_findings', [])]
);{{-- Reading in blade --}}
@foreach($visit->note->orthopaedic_findings ?? [] as $finding)
<span class="badge bg-light text-dark border">{{ $finding }}</span>
@endforeachphp artisan make:migration add_orthopaedic_findings_to_visit_notes_table// In the migration up():
$table->json('orthopaedic_findings')->nullable()->after('dermatological_findings');php artisan migrateThen add 'orthopaedic_findings' to $fillable and $casts in app/Models/VisitNote.php.
The file database.sql contains the complete schema, system seed data (unit/view/terminology templates), and demo patient data.
mysql -u root -p -e "CREATE DATABASE phims CHARACTER SET utf8mb4 COLLATE utf8mb4_unicode_ci;"
mysql -u root -p phims < database.sql
php artisan db:seed --class=AdminSeederinstitutions (id, name, parent_id, code, email, phone, address)
└── units (id, name, unit_number, institution_id, unit_template_id)
└── unit_views (id, name, unit_id, view_template_id)
└── [pivot] user_views (user_id, unit_view_id)
unit_templates (id, name, code, is_system)
└── view_templates (id, name, code, blade_path, unit_template_id, is_system)
users (id, name, email, role, institution_id, ...)
├── [pivot] user_units (user_id, unit_id)
└── [pivot] user_views (user_id, unit_view_id)
terminology_categories (id, name, slug, description, is_system, sort_order)
└── terminology_terms (id, category [→slug], term)
patients (id, name, dob, nic, mobile, phn, address)
├── patient_allergies (id, patient_id, allergen)
└── clinic_visits (id, patient_id, unit_id, visit_date, category, status, ...)
├── visit_notes (id, visit_id, presenting_complaints JSON, ...)
├── blood_pressure_readings (id, visit_id, systolic, diastolic)
├── investigations (id, visit_id, name, value)
├── visit_drugs (id, visit_id, type, name, dose, frequency, duration)
│ └── prescription_dispensings (id, visit_drug_id, stock_id, qty)
└── visit_drug_changes (id, visit_id, action, old_values, new_values)
drug_names (id, name)
└── drug_name_defaults (id, drug_name_id, type, dose, unit, frequency, duration)
pharmacy_stock (id, unit_view_id, drug_name, remaining, expiry_date, threshold)
└── pharmacy_restock_logs (id, stock_id, action, amount, performed_by)
unit_templates, view_templates, and terminology_categories all have an is_system boolean column.
is_system |
Meaning |
|---|---|
true |
Seeded by the system; protected from deletion in the admin UI |
false |
Created via the admin UI; can be deleted when no longer in use |
| Value | Description |
|---|---|
opd |
General OPD visit |
new_clinic_visit |
First clinic attendance |
recurrent_clinic_visit |
Follow-up clinic visit |
urgent |
Urgent / priority case |
| Value | Meaning |
|---|---|
waiting |
In queue, not yet seen |
in_progress |
Currently with doctor |
visited |
Doctor done, awaiting pharmacy |
dispensed |
Pharmacy dispensed |
cancelled |
Removed from queue |
OpenHIMS2 is open-source software licensed under the MIT License.
Pull requests are welcome. For major changes, please open an issue first to discuss what you would like to change.
When contributing a new clinical view template:
- Use Admin → View Templates to create it (blade file is auto-scaffolded)
- Replace the developer guide content in the blade file with your clinical page
- Optionally add it to
ViewTemplateSeeder.phpfor reproducible deployments - Update this README with the new template details